 An official website of the United States government.
 Query Biology by Attribute Tool
 This tool allows you to query a biology layer on an ESI map by attribute. For example, you can select a biology layer and construct a query based on species, state and federal status, monthly presence, and/or breeding status. You also have the option to limit the query to currently selected points or polygons. This gives you the ability to locate species of special interest in a particular area--such as where a spill trajectory indicates that there may be heavy oiling.
Learn more about the Query Biology by Attribute Tool, including:
Downloading the Query Biology by Attribute Tool
Download the latest version of the Query Biology by Attribute Tool:
- Query Biology by Attribute Tool [Zip, 43 KB]: Vs. 2.2, updated December 13, 2013.
Note: You can download the entire suite of ESI tools for ArcMap from the ESI Toolbar page.
The Query Biology by Attribute Tool is in compressed format as a self-extracting zip file: BiologyQuery.zip. [Need help with compressed files?] Once the file is unzipped, place the DLL file on your hard drive. For consistency, you may want to place it in the directory where most of the ArcGIS DLL files reside: ProgramFiles/ArcGIS/Bin.
Installing the Query Biology by Attribute Tool
Note: If you are running the Windows Vista or Windows 7 operating system and are unable to load the Query Biology by Attribute Tool using the following steps (i.e., you get a message that "no tools were added"), see the additional notes below. After you have saved the uncompressed BiologyQuery.dll file to your hard drive, launch ArcMap. To install a single tool onto the ArcMap toolbar:
- Right-click on the ArcMap toolbar and scroll down to "Customize" (or choose the "Customize" option under the Tools menu).
- Select the "Commands" tab on the "Customize" window.
- Click the "Add from file" button.
- Navigate to the BiologyQuery.dll on your hard drive. (If you don't see the file, your browser may not have unzipped the compressed version.) [Need help with compressed files?]
- Select the DLL file and click Open to add the Query Biology by Attribute Tool to your available tools. Click OK.
- Click the icon next to the Query Biology by Attribute Tool and drag it onto your standard toolbar. Release the mouse button when your cursor becomes a vertical bar. (You need to release the mouse button at or before the last icon on your toolbar.)
- Exit the "Customize" window.
Additional Notes for Windows Vista and Windows 7 users: To install any ArcMap DLL, you must have administrative privileges. The following approaches may be needed to successfully load the Query Biology by Attribute Tool if you are running Windows Vista or Windows 7.
- Launch a new ArcMap session by right-clicking on the ArcMap icon and choosing "Run as administrator." Follow the steps provided above to load the tool. Once it is loaded, you can launch ArcMap as a user and the Query Biology by Attribute Tool will be available.
- If the method described in the previous step did not work, try the following: As an administrator, go to Control Panel > User Accounts. If the User Account Control (UAC) box is checked, uncheck it and restart your computer. (Once you've installed the DLL file according to the rest of the instructions above, you can recheck the UAC checkbox and restart your computer to turn the UAC security back on.)
Using the Biology Query by Attribute Tool
To use any of the ESI tools, you'll need to begin by moving the atlas directory that resides in the Geodatabase directory on your ESI CD/DVD (or that you have downloaded) to your computer's hard drive. The tools are dependent on the layer names and relationships that have been set up inside the MXD file provided.
Follow these steps to use the Biology Query by Attribute Tool:
- Click the tool depicting a fish and SQL.

- You'll see the Create a Biology Query dialog box, which will guide you through the creation of a query on a particular biology layer. Once you select a layer, the menus on this dialog will be limited to values that are available for the Element (such as Bird or Marine Mammal) represented in the layer.
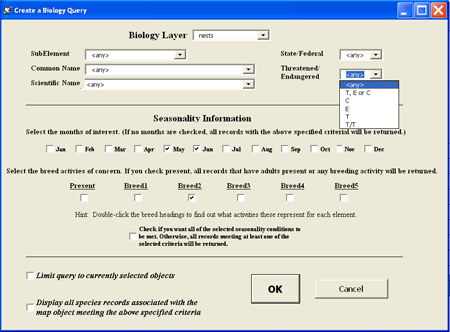 In this example, the Biology Layer "nests" is chosen. As a result, all of the species having the Element "Bird" will be available in the drop-down menus.
 - Let's say that you are interested in viewing the species of birds that are listed by either the state or federal government as threatened, endangered, or species of special concern. From the State/Federal drop-down menu, select the "S and/or F" item to show the bird species listed with any state or federal agency. The Threatened/Endangered drop-down menu shows all of the values found in the Bird records. Select the "T, E or C" item to show all species that have any threatened, endangered, or species of special concern status.
- Let's also say that you are interested in viewing the nest points where Laying or Migrating activities (Breed2) are occurring in either May or June.
- In the Seasonality Information section, check the boxes next to May and June.
- Check the Breed2 checkbox. (To learn what activities are represented for each of the Elements, double-click the Breed headings.)
- You can require that all of the seasonality conditions are met by checking the box at the bottom of the Seasonality Information section. In this case, that would mean nests where Breed2 activities are occurring in both May and June.
- In the bottom section of the dialog box, two check boxes provide additional options:
- The first check box allows you to limit a query to the currently selected objects, which is useful if you're only interested in a particular region of the atlas. For example, imagine that you had overlaid a spill trajectory onto your map and then located the polygons or points that lie, at least in part, inside the anticipated impact zone. If you have selected the nests inside the spill trajectory, you may now want to limit your selection to nests where birds are present during March, the month in which the spill occurred. If you selected nests as the layer, checked March in the Seasonality Information, and then checked the Limit option, you would see only the species records where birds located in your limited geographic extent are expected to be present in March.
- The second check box allows you to view records for all species residing in a point or polygon where there is at least one record matching the criteria. Let's say you are looking at Bird polygons, and you want to show only polygons in which state- or federally-listed species are present. There may be many polygons that meet the criteria, and other non-listed bird species may also be present in these polygons. By selecting this box, all species that share a polygon with a listed species would be shown in the Biofile table.
- Click OK.
More Information about ESI Maps
ESI Maps: Overview of ESI maps.
ESI Toolkit: Tools and resources for ESI maps.
Questions: Contact us with your questions, comments, or suggestions about the ESI Tools.