 An official website of the United States government.
 Ask Dr. ALOHA: Working with Toxic and Odor Thresholds, Step 2
Displaying the Threat Zone Estimate in ALOHA (Fictional Example)
So far, Jim has entered the scenario information (that is, details about how the chemical is being released into the environment) into ALOHA, and now he is ready to display ALOHA's threat zone predictions.
Jim selects "Threat Zone" from the Display menu. A dialog box appears asking him to choose the hazard he wants to analyze. Based on the scenario information Jim entered, ALOHA can model three hazards: toxic area of a vapor cloud, flammable area of a vapor cloud, or blast area of a vapor cloud explosion. Jim selects the toxic area option.
Next, a Toxic Level of Concern dialog box appears. A toxic Level of Concern (LOC) tells you what level (threshold concentration) of exposure to an airborne chemical could hurt people if they breathe it in for a defined length of time (exposure duration). For each scenario in ALOHA, Jim can choose up to three LOCs in ALOHA to assess different levels of potential exposure. For toxic vapor clouds, ALOHA uses those LOCs to estimate threat zones where the ground-level pollutant concentration is predicted to exceed the LOC at some time after the release begins. If three LOCs are chosen, ALOHA will display the threat zones in red, orange, and yellow, overlaid on a single picture. By default, the red zone is the worst hazard, typically based on a threshold concentration above which health effects may be life threatening.
ALOHA provides you with default LOC values, and you can also choose your own. For this chemical, ALOHA has three types of toxic LOCs to choose from: AEGLs, PACs, and an IDLH limit. Jim knows that ALOHA defaults to the best public exposure guidelines available (or the IDLH limit if no public exposure guidelines are available), so he decides to keep ALOHA's default AEGL options and just clicks "OK" to see ALOHA's threat zone picture. (For more information on this topic, read the Ask Dr. ALOHA article on choosing toxic LOCs.)
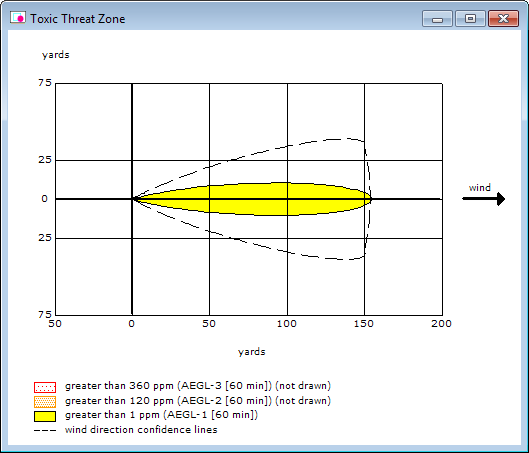 The red and orange threat zones are not draw because of the effects of near-field patchiness, but approximate distance estimates are provided in the Text Summary screen.
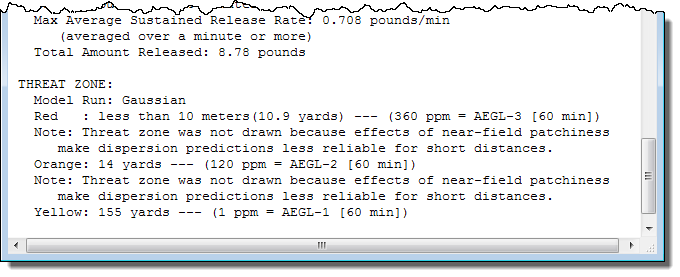 After reviewing both the threat zone picture and the Text Summary screen, Jim sees that the ethyl mercaptan vapors primarily pose a significant toxic hazard to people who are close (that is, within about 20 yards) to the puddle on the deck of the vessel. However, Jim knows that ALOHA's prediction is only a ballpark estimate of the real area where concentrations may reach toxic levels. He will be alert to any new information about weather conditions or the circumstances of the spill and ready to run ALOHA with new information if necessary.
Jim advises the vessel captain to make sure that none of the ethyl mercaptan is leaking into the vessel or pooling in other confined spaces. Outside, on the deck of the vessel still at sea, the vapor from the evaporating puddle mixes quickly with the air and the concentration of the ethyl mercaptan vapor in the air remains low. However, in confined spaces, the concentration may rise high enough to present toxic and flammable hazards.
After reviewing both the threat zone picture and the Text Summary screen, Jim sees that the ethyl mercaptan vapors primarily pose a significant toxic hazard to people who are close (that is, within about 20 yards) to the puddle on the deck of the vessel. However, Jim knows that ALOHA's prediction is only a ballpark estimate of the real area where concentrations may reach toxic levels. He will be alert to any new information about weather conditions or the circumstances of the spill and ready to run ALOHA with new information if necessary.
Jim advises the vessel captain to make sure that none of the ethyl mercaptan is leaking into the vessel or pooling in other confined spaces. Outside, on the deck of the vessel still at sea, the vapor from the evaporating puddle mixes quickly with the air and the concentration of the ethyl mercaptan vapor in the air remains low. However, in confined spaces, the concentration may rise high enough to present toxic and flammable hazards.
Next, Jim decides to estimate the "phone call zone" (step 3).
Last updated
Friday, July 10, 2015 12:49pm PDT