 An official website of the United States government.
 GNOME Trajectory Import Tool
NOTE: As we transition from the desktop version of GNOME to the GNOME suite of tools, we will no longer be outputting the MOSS files for Arc in WebGNOME. As a result, this tool will be deprecated and we will be unable to support its use going forward.
The GNOME Trajectory Import Tool is designed to import GNOME "splots" or NOAA trajectory products into ArcMap 9.x and 10.x. (Splots are point information showing movement of the individual Lagrangian elements used in GNOME.)
The latest Trajectory Import Tool is vs. 4.0. This tool is a major rewrite of the original Import Tool. Bug fixes and functional changes are listed below. All of these modifications apply only to the import of the trajectory contours. These are the changes in the new tool:
- Flags and corrects any degenerate oiling polygons that come out of the MOSS files. In the past, these issues would either prohibit clipping of shoreline (resulting in a fatal crash) and/or attributes of adjacent polygons could "leak" into each other, potentially rendering faulty spatial analysis based on attribute or area.
- Gets rid of "background" polygons embedded in some of the MOSS contour files, converting the attribute value to that of the surrounding polygon.
- Adds the import of beached splots. Since the contours only represent floating oil, it is important to see where the oil was previously beached.
- Changes the representation of the uncertainty polygon from a single red line to a gray filled polygon.
- Converts the imported polygons to single multi-part polygons based on oiling forecast (i.e., there is a maximum of four features in each trajectory, one feature each for "light," "medium," "heavy," and "uncertainty" oiling).
- Creates both a ClippedTrajectory and an (unclipped) Trajectory if the user opts to clip the input to a shoreline. Only the clipped version will be added to the map, but the unclipped version is available in the Geodatabase.
In general, the tool is now more robust and anticipates some non-standard issues that can be found in the MOSS files.
This page outlines how to get and use the tool:
Downloading the Trajectory Import Tool
- If you are running ArcMap 9.3 or 10.0, download gnomedll_93.zip, the compressed version of the gnome.dll file: GNOME Trajectory Import Tool for ArcMap 9.3 [Zip, 77.1 KB]. This tool was posted 02/17/10.
If you are running ArcMap 9.2, download gnomedll_92.zip, the compressed version of the gnome.dll file: GNOME Trajectory Import Tool for ArcMap 9.2 [Zip, 68.8 KB]. This tool was posted 3/16/07.
If you are running ArcMap 9.1 or 9.0, download gnomedll.zip, the compressed version of the gnome.dll file: GNOME Trajectory Import Tool for ArcMap 9.0 and 9.1 [Zip, 81.9 KB]. This tool was posted 5/12/05.
The file has been compressed as a self-extracting zip file so that it can be downloaded more easily from the Internet. [Need help with compressed files?] Look for the file, gnome.dll.
Your computer may display a message that it is unable to open the file, gnome.dll, because it doesn't know what application created it. You can disregard this message and continue with step two.
- Save the gnome.dll file to your hard drive. We recommend that you save it with the other ArcMap DLLs in the directory, C:/Program Files/ArcGIS/Bin.
Installing the Trajectory Import Tool
Note: If you are running the Windows Vista or Windows 7 operating system and are unable to load the Trajectory Import Tool using the following steps (i.e., you get a message that "no tools were added"), see the additional notes below. After you have saved gnome.dll to your hard drive:
- Launch ArcMap.
- Right-click on the ArcMap toolbar and scroll down to "Customize" (or choose the "Customize" option under the Tools menu).
- Select the "Commands" tab on the "Customize" window.
- Click the "Add from file" button.
- Navigate to the gnome.dll file on your hard drive. (If you don't see the file, your browser may not have unzipped the compressed version.) [Need help with compressed files?]
- Select the DLL file and click Open to add the Trajectory Import Tool to your available tools. Click OK.
- In the scrollable list on the left side of the "Customize" window, highlight "ArcObjectTools."
- On the right you should see the "GNOME Import Tool (vs. 4.0)" command. Click the application icon next to the command, and drag it onto your standard toolbar. Release the mouse button when the cursor becomes a vertical bar. (You need to release the mouse button at or before another icon on your toolbar.)
- Exit the "Customize" window.
Additional Notes for Windows Vista and Windows 7 users: To install any ArcMap .dll file, you must have administrative privileges. The following approaches may be needed to successfully load the Trajectory Import Tool if you are running Windows Vista or Windows 7.
- Launch a new ArcMap session by right-clicking on the ArcMap icon and choosing "Run as administrator." Follow the steps provided above to load the tool. Once it is loaded, you can launch ArcMap as a user and the Trajectory Import tool will be available.
- If the method described in the previous step did not work, try the following: As an administrator, go to Control Panel > User Accounts. If the User Account Control (UAC) box is checked, uncheck it and restart your computer. (Once you've installed the DLL file according to the rest of the instructions above, you can recheck the UAC checkbox and restart your computer to turn the UAC security back on.)
You are now ready to use the GNOME Trajectory Import Tool!
Using the Trajectory Import Tool
If you are responding to an oil spill or drill and have asked for and received a set of files with a .ms1-7 suffix from NOAA's Office of Response and Restoration (OR&R), you can import GNOME's splots into ArcMap using your own base map or ESI for shoreline. If not, you can download and review the Sample Input Files [Zip, 521.1 KB]. The file SampleInput.zip is a self-extracting zip file, so look for the files, sample.ms1 through sample.ms7, as well as the two image files, scalebar.bmp and gnome.bmp.
Importing Splots
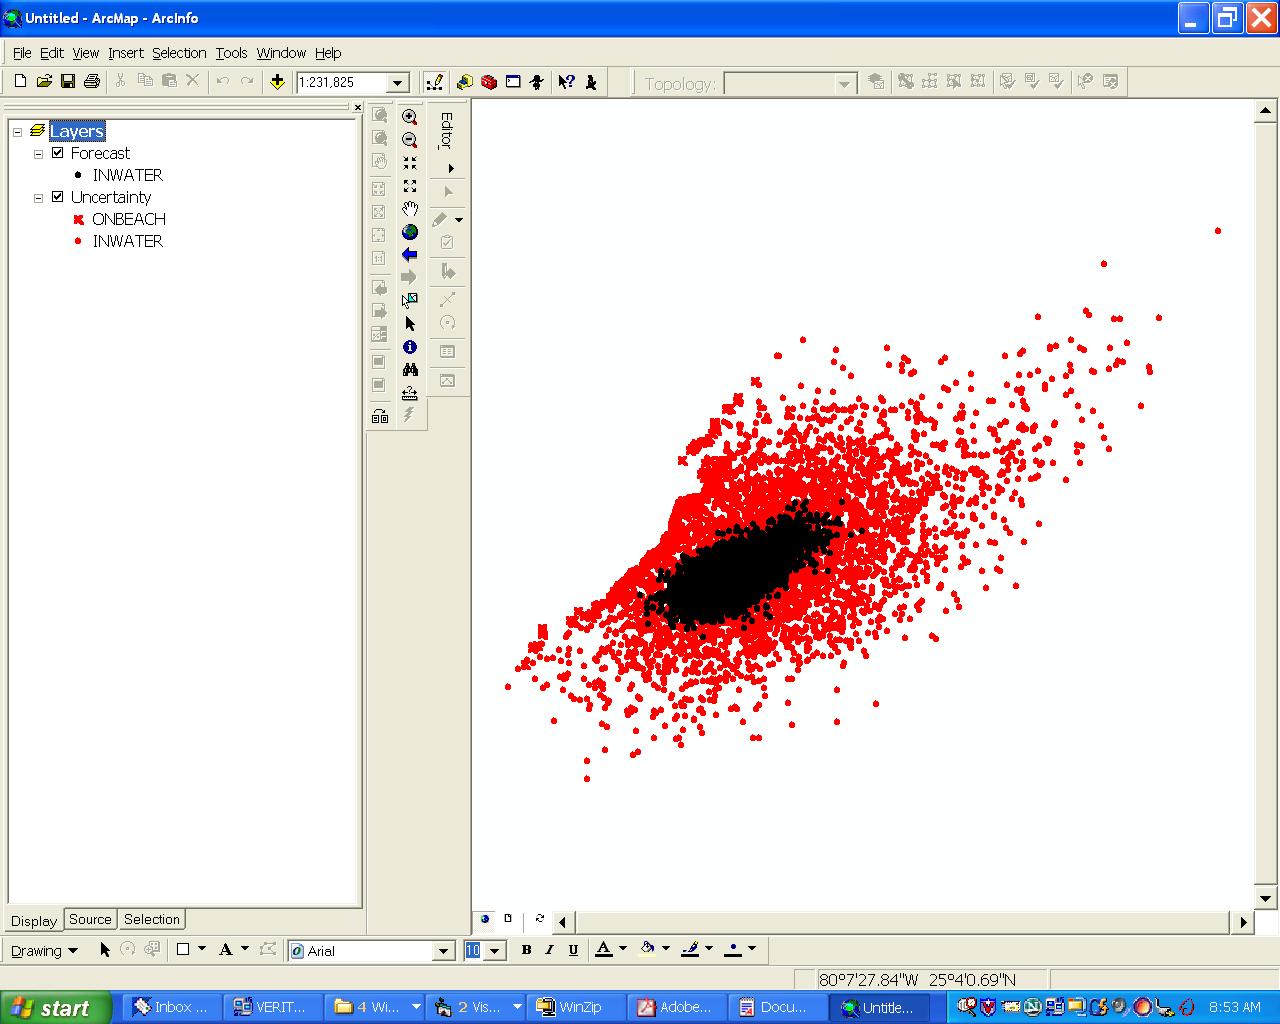
For import of the trajectory "splots," you will need the files .ms4 through .ms7. (If you'd like, you can follow the instructions, Generating GNOME Files, to create a GNOME output file set.) With this option, a forecast and an uncertainty layer are generated, showing splots that are beached, as well as those that are in the water. You should note that a base map is not included with this option.
Download the GNOME Splot Output Example [JPG, 156.0 KB] to see an example of GNOME splots displayed in ArcMap. Black splots represent GNOME's Forecast trajectory, the best estimate of where the spilled oil will go. Red splots represent the Uncertainty trajectory, the "minimum regret" area for the same spill.
Importing Trajectory Contours
Message boxes and standard dialogs will guide you through the import process. To import the trajectory contours, you will need the .ms1 and .ms3 files. The tool also imports the forecasted beached oil; for this step you will need the .ms4 and .ms5 files.
You will also need a file called scalebar.bmp. (If this bitmap did not come with the set of trajectory files you are working with, download the Oil Distribution Scale bitmap file [image/bmp, 17.5 KB].)
If you don't have a GNOME or NOAA icon as part of your GNOME output file set, you may also want to download the gnome.bmp file [image/bmp, 66.3 KB],which provides the GNOME icon that will be displayed at the top of your final map layout. If you choose to create your own logo for the display, name your logo file "gnome.bmp".
Place the .bmp files in the same directory as your .ms# files.
Clipping the Trajectory Contours to a Shoreline Base Map
When importing trajectory contours, one option is to clip the contours to a shoreline base map. You may use your own shoreline layer or a shoreline provided as part of the GNOME output package. Either way, if you choose to clip the contours, you must not have any spaces in the shoreline source file name or path. For this reason, if you obtain GNOME output that uses spaces in the name or path, it's best to remove them before you start the ArcMap import.
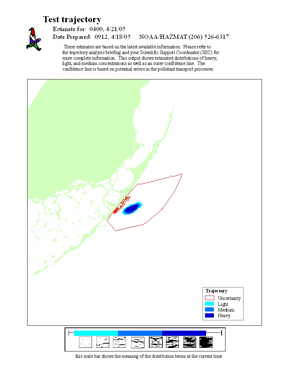
Once the contours are imported, they are color-coded to indicate heavy, medium, and light oiling levels. These are relative terms. A map layout (sample shown above) is created that includes a scalebar at the bottom, showing the range of oiling expressed by these terms. The layout also provides a header that gives the time and date for which the trajectory was prepared, the date the trajectory was prepared, contact information, and a caveat describing special circumstances or limitations of the trajectory.
Removing the Trajectory Tool
To remove the GNOME Trajectory Import Tool from your toolbar, open the “Customize...” window and drag the icon off the toolbar.
Questions: Contact us with your questions, comments, or suggestions for GNOME.
Go back to the GNOME Toolkit page.